Installation
MacOS Systems
Contributor: Dzhuliya Dashtamirova
For the time being you should clone the BEAT repository from our Github page.
git clone https://github.com/dzhuliya/keeping-the-BEAT.git
You will also need to have MultiNest/PyMultiNest installed on your machine. If you do not have MultiNest installed, follow the instructions found here under “on your own computer”. If you are on MacOS, we recommend following the instructions found here.
If you run into issues installing PyMultiNest with pip install, try:
conda install -c conda-forge pymultinest
In our experience, the following instructions worked on a Mac:
Install both Xcode and the Xcode Command Line Tools
- Install Macports
Set up Macports to sync via git instead of rsync
Use the Astrobetter website guide to install gcc5, cmake and openmpi. If you have issues with installing openmpi via sudo port install openmpi, then try installing with brew.
Set correct version of gcc and mpi within Macports. Refer to this website if you have trouble: https://stackoverflow.com/questions/8361002/how-to-use-the-gcc-installed-in-macports Note: Make certain the the PATH of the user is set such that the Macports version of gfortran is seen as the default gfortran compiler. Other gfortran compilers will fail.
Install anaconda and astroconda. Activate the astroconda environment.
Use pip to install mpi4py
Download Multinest
git clone https://github.com/JohannesBuchner/MultiNest.git
cd MultiNest/build/
cmake ..
make
sudo make install
Download PyMultiNest
git clone https://github.com/JohannesBuchner/PyMultiNest.git
cd PyMultiNest
python setup.py install
You can test your MultiNest installation following the instructions also listed on Astrobetter
Simple example fit
Contributor: Julia Falcone
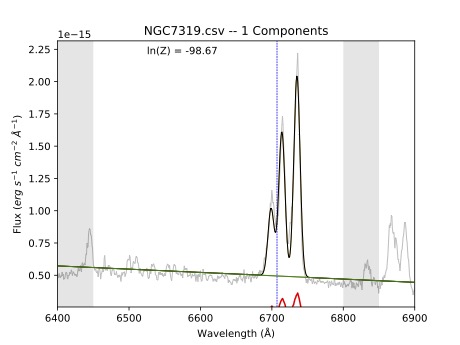
Let’s test that BEAT is correctly installed and working properly on your machine. From the top level of the keeping-the-BEAT repository, navigate to the BEAT example fit directory and open the BEAT example notebook.ipynb Jupyter notebook. If you run all cells in this notebook without changing anything, it will take the single spectrum in the spectrum folder (taken from long-slit observations NGC 7319) and fit it.
It will create a new directory in the current location called ngc7319_out, which stores the results of the fit. It should produce three PDF files in the plots folder, which should look like the plots below: